Showing posts with label preserving. Show all posts

11 May 2012

Lap yuk - Chinese air dried bacon

I've had a months' sabbatical from SDON having become a bit unmotivated with blogging. Hopefully I'm now suitably refreshed and ready to get back into the swing of things. The most interesting thing I've made recently has been lap yuk - air dried Chinese bacon.

First up props to the original source: Sunflower Food Galore, one of my favourite food blogs. If you want loads of interesting East Asian and specifically Chinese recipes head over. The archives are a gold mine.

Sunflower's lap yuk recipe can be found here - I followed it more or less to the letter so I won't bother repeating it all.


This is a very easy first step into the world of curing meats, a world which may seem intimidating at first. The only specialist ingredient is Prague powder (also known as Instacure or curing salt or pink salt). The key thing to note is that there are actually two Prague powders/Instacures/pink salts - Number 1 always contains 93.75% table salt (sodium chloride) and 6.25% sodium nitrite. Number 2 always contains 89.75% table salt, 6.25% sodium nitrite and 4% of the slower acting sodium nitrate. Number 1 is used for fresh sausages and Number 2 for air dried sausages as well as whole meat products like this bacon or the Italian coppa.

The sodium nitrate and nitrate helps cure the meat, preserves pink colours in certain things and discourages dangerous bacteria including that responsible for botulism. Neither versions are expensive and can be easily obtained on Ebay or Amazon. Safety warning - in large amounts they are toxic so be careful with amounts in recipes and don't let any kids near them!

Right, with that out the way here is what you are going to need (cribbed from Sunflower).

  • 1.75 - 2 kg belly pork
  • 1/2 cup of light soy
  • 1 tbsp dark soy
  • 1/3 cup sugar
  • 2.5 tbsp salt
  • 1 tsp five spice
  • 2 tsp crushed Sichuan peppercorns
  • 1/3 cup Shaoshing wine
  • 5g #2 cure salt (Prague #2 or insta cure #2)

Get your butcher to cut the pork belly into long thick strips. Mix all the other ingredients together to make a marinade (shown up top). I added a few chillies too. Put the meat in a sealed bag with the liquid.


Keep the bacon in the fridge for three or four days and turn once or twice per day so all areas are exposed to the wicked flavours.

Remove the meat, put some string through the end and hang up somewhere with a slight breeze. My long suffering co-habitees let me use our curtain rail.
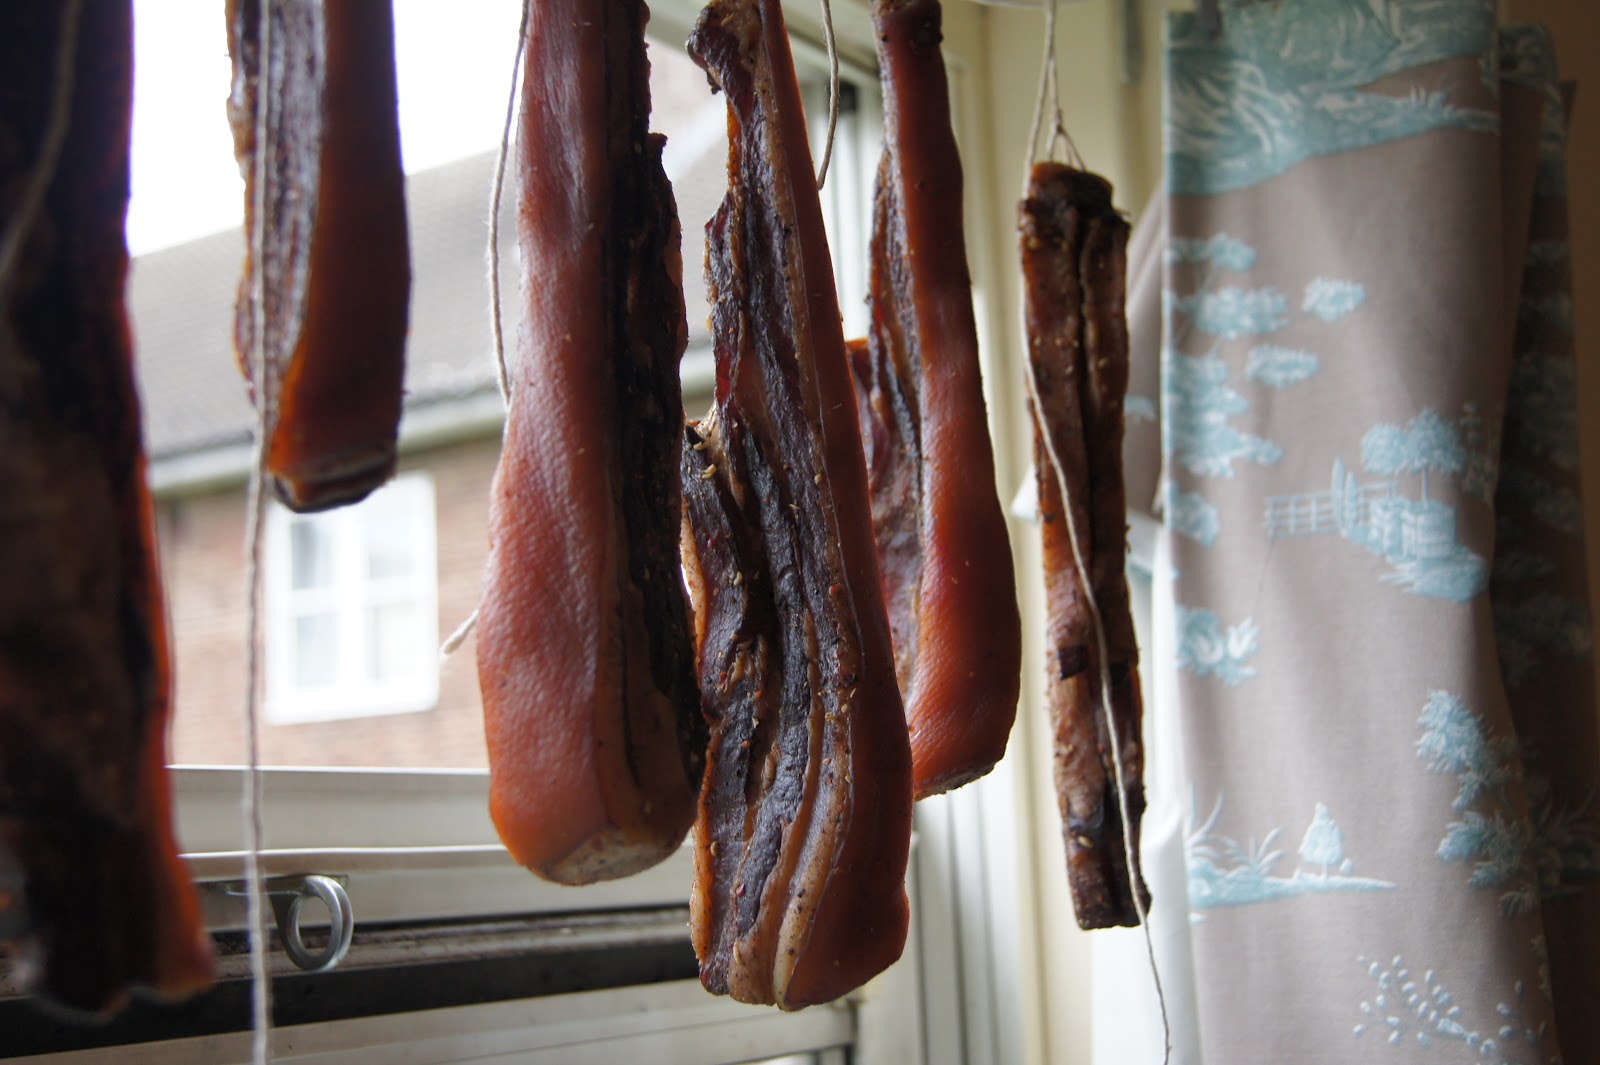


These two photos were taken after a couple of days of hanging. You can clearly see the meat has lost some mass (in the form of moisture). It's also darkened a lot. That's the result of both the wet cure in the fridge with the salt and sodium nitrate/nitrite and the gradual air drying.


context shot of location


Sunflower recommends a week's drying. My bacon is seen in cross-section below and I've got to say was (is) bloody tasty. Big success this one. I've only had lap yuk a couple of times - most memorably in an excellent stir-fry at Gourmet San with leek and crispy tofu - but the taste of this was absolutely spot on. It's got an extremely strong flavour - salty, fatty but most of all muskily meaty, with the warmth and perfume of the spices coming through at the end.


Hold tight for some recipes involving the bacon. I've found it most straightforward to use as lardons or slices in stir-frys. I chop the bacon and fry it first before adding chilli pastes, garlic etc. This allows some of the fat to render out and subsequently coat the stir-fry, and also the chance for the fat to crisp up a little. The skin is pretty chewy, I think it's fine to remove it if it's not too your taste. From a bit of googling I'd guess that steaming the bacon is the most popular and traditional means of cooking, however I'm very fond of frying it to obtain some crispiness.

As a first go at curing meat lap yuk was a highly satisfying experience. Easy and very rewarding, I've got my hands on a copy of Charcuterie and an old school meat mincer for sausage making so watch this space.

PS
A few thoughts:
  • Make sure you get the pork belly end without the ribs in. Most of mine was boneless but it had mini cartilaginous proto-ribs at one one as you can see above (the two central white circles).
  • Check the bacon after five or six days drying as mine was very hard after seven.
  • It's a strong tasting and robust kind of thing, so don't worry too much about exact details!

27 February 2012

Carrot and apple jam

I made this jam a while ago after foraging a load of apples from a tree growing in a farmer's field in Norfolk. The tree was alone and stood the the edge of the field as if it had grown there by chance, or been seeded by a careless walker's discarded snack. The apples were rotting beneath it. This is the first jam I've ever made.


I've thought carrots would go quite well with the apple in a jam due to their high sugar content - they do after all crop up in Indian sweets and carrot cake. Not being the jamming expert I needed a recipe to follow and found this one online. Its small amount of ingredients and straightforward sounding processes were appealing – I immediately decided to ramp up the ginger to get good harmonies going with the carrot. It does include a silly suggestion of adding a few drops of food colouring to  get a really orange colour which needless to say is not the SDON way at all. So you're going to need -

  • 500g apples
  • 300g carrots
  • a medium - large piece of stem ginger chopped
  • 625g sugar
  • pinches of cinnamon and chilli
  • juice of two lemons

Grate your vegetables - remember the magimix is your friend. Far too arduous to attempt by hand.


Combine all the ingredients and cook down until, well, jammy. Being a novice I went too far here and by the time the jam had later cooled it had gone a bit too solid. It still tastes delicious mind, but it's in semi-solid chunks and not great for spreading. The taste though, is wonderful - extremely sweet, with the toffee-ish texture giving way to caramel, then the warmth of the ginger and finally the sweet shreds of carrot. I think it is slightly too sweet actually, so have lowered the amount of sugar above accordingly.


As well as your standard toast and butter combo this jam went very well with a bit of gruyere - just a smidgeon of jam was enough to set of the nutty cheese very nicely. It's not really so far from the chilli jams that we use in savoury food so I wouldn't be too slavish in only using it for sweet dishes. The other thing it would be sensational in I think is some sort of jammed up treacle tart or sponge pudding....


12 October 2011

Spicy green tomato chutney


As well as cucumbers my communal garden has lots of tomatoes. Unfortunately they too have been a bit neglected and I fear that it's a bit late in the year for them to ripen. So I picked a load of them and made a spiced green tomato chutney. I like Nigel Slater's suggestion of putting a few ripe tomatoes in the mix as well, so I chucked in a few shop bought ones.

In the spirit of educating myself about chutney-making I did everything by eye.
  • the amount of tomatoes above (two kg?)
  • 400g sugar
  • 350 ml vinegar (try malt/white wine mix)
  • chopped fresh chillies to taste
  • two onions chopped small
  • a handful of raisins
  • a few cloves, peppercorns, star anise, cumin, coriander seed - take your pick


Fry your onion in oil for five minutes then add everything else (easy huh?). Cook on a low heat for fifty - sixty minutes.


After finding the plum chutney (which I recently broke out - very nice. It had softened and rounded over time.) I made a while ago a little bit liquid I was careful to leave this one for an extra twenty minutes or so. It probably had about an hour in total. The tomatoes break down very thoroughly and make a wonderfully jammy matrix for the other bits.


Push a bit to one side and if it doesn't rush back immediately it's nearly ready.
 

Have your empty jam jars immersed in another pot with boiling water and decant your hot chutney into them.


My chutney draw is getting pretty healthily populated!


17 June 2011

Fish-fragrant aubergine pickle


I love preserving, but the conditions have to be right. It usually happens during a lazy (or rainy) weekend afternoon I find. I think it's because of the delayed reward - when I cook in the week it's because I want to scoff the food. But preserving's a different game altogether. You have to do it all for love and not, initially, for taste. Make the food, put it in a dark drawer and forget about it for a while. I've still not tasted my hot and sweet plum chutney, although I did cave in and eat the green bean chutney pretty soon after making and jolly nice it was too. I found that even a week or two rounded out the vinegar and gave it a gentler and more complex flavour.

The idea for this pickle was pretty simple - make some fish-fragrant aubergines as normal but ramp up the vinegar and sugar in them to levels that preserve the vegetables and allow them to mellow and mature over the course of a few weeks.

  • two big aubergines or equivalent small Asian ones
  • a pepper
  • a bunch of spring onions
  • plenty of chopped garlic and ginger, sugar, chilli broad-bean paste, Chinkiang vinegar, malt vinegar, soy sauce

Chop the aubergine into medium sized chunks. I thought a pepper would be nice to provide a spot of colour - if you decided to include this chop it into similarly sized pieces.

Fry the veg in some oil for seven or ten minutes until it becomes soft. Set to one side.


Chop the garlic and ginger and fry with the chilli bean paste and chopped spring onions for a minute or two until fragrant. I use this Pixian bean paste (川老汇郫县豆瓣) which is 30% broad-beans (more than some others I have seen) and quite rough and thick (and delicious).


Add the soy sauce, some sugar (maybe four or five tablespoons), quite a few good shakes of each vinegar and some water. You need a little liquid. Reintroduce the aubergine and pepper and cook everything together for five minutes.


When it looks nice and jammy spoon the mixture into sterile jam jars. Some people suggest putting the jars in the oven but I've always found it quicker to have them in a bubbling pot of water on a slow boil.

This amount makes about four jam jars' worth of pickle. Dunno what it's going to taste like: might be horrible. But I like the idea of it. All you'd need is some rice, stir-fried veg and a bit of this pickle. I'll keep you posted.

1 February 2011

Hot and sweet plum chutney


I like chutney recipes which cook everything together in one pot. No need to soften the onions in this one - everything goes in, simmers for an hour and then comes out. The recipe is from Nigel Slaters's Tender II. It's an extremely handsome book but I'm finding it better to look at than cook from at the moment. Could just be me, mind.


Ingredients
    • 750g plums
    • 250g brown sugar
    • 125g raisins
    • 350g chopped onions
    • 150ml each cider and malt vinegar
    • two teaspoon yellow mustard seeds, one salt and half dried chilli
    • cinnamon stick


Two things I reckon seem to happen with chutneys, though I'm still learning the ropes. Firstly they become less liquid after a while which is good as this one really needs it. And secondly the flavour gets better - rounder, with the harshness of the vinegar receding and the gentler tones of fruit, sugar and spice coming to the front. At least that’s what I’m hoping happens here. At the moment it’s tangfastic beyond belief: mouth-puckeringly sharp, sweet and vinegary at the same time. I'm hoping that a lie down in a dark place for a month or so will tame it a bit.

PS. If anyone knows about the scientific reasons behind chutneys maturing and changing in taste please do tell.

1 November 2010

Green bean chutney

Upon reading Nigel Slater's recipe for runner bean chutney with an abundance of green beans in the fridge and empty jam jars piling up in the cupboards it seemed like a good shout for a bit of mid-week preserving.


From my limited experience in chutney making it seems that as long as the main ingredient is accompanied by vinegar, sugar and spices you can't really go wrong. So after top and tailing the beans I fried an onion and added the spices suggested as well as some star anise and chilli.


In the spirit of keeping things simple I didn't bother cooking the beans separately but rather chucked them into the main pan to cook. I also omitted the cornflour. After another ten minutes or so I checked a couple of beans to ensure they still had the necessary squeak and bottled the stuff.


I think I was fairly liberal with the spicing and vinegar pouring so the chutney is pretty strong stuff. A bit too stong to eat large amounts of but just the ticket with a bit of cheese and bread. I'm a bit of an amateur when it comes to preserving and chutney making so please give me some ideas if you have made any good ones!